

“Before anything else, preparation is the key to success.”
(Alexander Graham Bell)
Are you prepared for the Google Analytics 4 (GA4) switchover?
If you are currently using Universal Analytics (UA), you should change to GA4 now.
Otherwise, your business or brand stands to miss out on being able to compare your year-on-year data in GA4 come 1 July next year when Universal Analytics stops processing data.
The switchover process looks simple for some but the reality is there are a lot of steps hidden away that you should get across.
To make things easier, here’s your step-by-step guide on how to upgrade to Google Analytics 4 and set up your Google Analytics 4 Property.
Universal Analytics to GA4 – Main differences and their impact
Before diving into the details, though, let’s look at the key differences between UA and GA4. Google has also added detailed information to their Help Center, but here’s the abbreviated version:

Perhaps the most significant change is the data structure and data collection logic GA4 uses. GA4 is an event-based model, meaning each user interaction is captured as a stand-alone event. This is more meaningful than measuring just a simple page load (or hit) on your website.
The other relevant change to keep in mind is that GA4 has a different account setup. It features only two types of data settings, Account and Property.
The outcome and benefit of these changes are that you can now bring data from multiple websites and apps (including IOS and Android) together in your GA4 property, using data stream(s).
Getting started
If you are new to Google Analytics, you will automatically be starting in GA4! In that instance, once you have created your account, all you have to do is click Create Property and give it a name.
As an existing UA customer upgrading to GA4, you will likely see a banner at the top of your screen asking you to switch over. Click Let’s Go.
If there’s no banner visible, go to theadmin icon, find Property and click on Setup Assistant, then Get Started.
From here on in, most setup steps will be the same whether you are switching over from UA or a new user of GA4.
10 Steps to set up your GA4 Property
Step 1: Set up Property
The first step is to give your Property a name, choose the time zone you are in and the relevant currency, and add basic information about your business and your preferences. Once done, click Create.
Good to know: If things change or you’ve missed a selection, you’ll always be able to adjust your details later.
Step 2: Set up the data stream(s)
Three types of data streams send data to your Analytics: Web, iOS, and Android. You’ll need to create that connection for each one of your websites and apps to start collecting data (for the ones you have). Give each one a name and add its URL.
You can now add more than one website if you have multiple that you wish to connect with the same property. We recommend doing so if it’s the same business, but if a totally different category – best to keep it separate by creating another property.
We recommend you leave enhanced measurements on too that will allow you to measure things like YouTube videos, downloads, and 90% page scrolls for the first time without extra tags required.
Good to know: Your data streams automatically exclude known bots and spiders!
Step 3: Install the configuration tag
You now have your stream set up; the next step is to install the tag. You’ll want a tag on every page you wish to collect data from.
You can use an existing on-page tag or create a new one.
You may need the G measurement ID or the tag instructions depending on how you set up the tag. And if you already use the global tag for UA, you may be able to use the connected site tag feature instead of installing new code.
Good to know: Google is promoting its Google Tag Manager system for this task and also offers detailed instructions.
Tag configuration options and recommendations
Google has provided thorough details relating to setup options for CMS-hosted websites. We’ve collated the most common ones for you here:
WordPress
- Plugin: Our favourite plugin for this function is MonsterInsights. It has user ID tracking built-in, more internal traffic controls than other plugins and eCommerce/goal tracking (paid version).
- Theme settings: The Divi theme builder or Genesis Framework lets you add head tags and body tags in the theme settings. Elementor and other builders may also have this feature.
- Add to theme file (Note that this is very techy): Add Google Analytics global script or Google Tag Manager from the data stream to your header.php file. Make sure you have a child theme.
Shopify
- Plugin: We recommend using a paid plugin, such as Littledata, a Google Analytics app for Shopify and Shopify Plus; it starts at $99/month. At the moment, Shopify does not support G IDs, only Universal. This is however likely to change.
- Theme settings (Somewhat techy): Go to online store > themes > actions (on relevant themes) > edit code > theme.liquid > add code to <head> tag section.
Squarespace
- Settings: Go to settings > advanced > external api keys > add measurement ID then add your G-ID details. Note that the ID can be found in data stream in GA4.
- Code injection (somewhat techy): Add GA global script or Google Tag Manager from the data stream to the code injection section. Note that this option is only available to paid Business or Commerce level plans.
Google Analytics – Universal Analytics
Connected site tag: You will need to connect the site tags to both UA and GA4 properties. Note that there may be a 30-minute delay.
Google Tag Manager
GA4 Configuration Tag: To set up your GA4 tag, you can find instructions for this in the GA4 admin tab. From there, go to > property > setup assistant > tag installation > data stream > tagging instructions.
Step 4: Check that your tag is working
You can check whether the tag is firing using report > real-time report. The real-time report will show an app’s or website’s users within a specific timeframe.
If something is not connecting, you can do a few things. Check:
- that you added the correct measurement ID or tag;
- the tag is placed in the correct theme file or spot;
- whether your changes, e.g. file manager / edit codes, are saved or published;
- that you added connected site tags to both UA and GA4 if using them;
- whether there are any users on your website at this particular time, if not, try accessing your website on a different tab and refresh the page.
- whether you have created a filter previously excluding your IP address.
Step 5: Set up internal filters
Use filters to exclude your own traffic or your teams. GA4 no longer has a View setting, which means getting the filters right is crucial *see also Step 8.
- Go to Admin in the bottom left corner, > Properties > Data streams.
- Then select the given data stream next to the right one, using the > symbol.
- Next, select More Tagging Settings.
- Select define internal traffic by using the > symbol.
- Enter a rule name, e.g. internal IP Office
- Leave it as internal unless you want to differentiate the rules, then select the dropdown for the IP option you have.
- Press Create to save your settings.
Note:
- You can exclude your IP address if it’s static (not dynamically changing).
- GA4 users can have up to 10 filters per property. However, filters are limited to “internal” and “developer” parameters for now.
- You can only enter 1 IP address per rule. If you have multiple IPs, you will have to create separate rules at the moment.
- Use Audiences if you want to exclude other variables, e.g. /wp-admin to exclude users who have logged in to your admin backend.
Good to know: You can find out your IP address at whatismyip.com
Step 6: Set up referral exclusions
A referral exclusion prevents users from starting a new session when they come from a given website. It turns the traffic from a referral to direct traffic.
For instance, if you have a membership site on another domain that users then come back to yours, you may find it useful to exclude the membership site domain as a referrer.
- Go to Admin in the bottom left corner, > Properties > Data streams.
- Then select the given data stream next to the right one, using the > symbol.
- Select more tagging settings.
- Then select List unwanted referrals by using the > symbol.
- Add your domain along with any domains you no longer want to be a referral.
As an existing UA user, go to Acquisition > All Traffic > Referrals in UA to identify potential referral exclusions such as paypal.com or afterpay.com for an eCommerce store.
Good to know: You can add more than one domain / query in each condition.
Step 7: Refine your data settings
It’s now time to improve your data collection.
Google Signals allows for cross-device data capture in a range of Google’s products. It will show these in reports if your website has collected 500 users on average for a month per day. The tool will hide this extra information in reports below this threshold to protect the privacy of users. However, it is still used to build audiences such as for the use of Google Ads.
If a user is signed in to a Google account, this is another way Google can piece together a user so they are no longer duplicated when viewing your site or app from several devices.
- Go to Admin in the bottom left corner, > Data Settings > Data Collection
- Select Get Started, then Continue to activate Google Signals enable features
- You will get to a page outlining the features and settings. Click on activate, then on I acknowledge.
- Once that is done, go back to your Data Setting and choose Data Retention
- We recommend selecting 14 months of data retention, unless your country doesn’t permit this timeframe.
- Leave reset user activity on ON and press save.
Good to know: Data retention applies to Explore (Exploration) reports only. Your other reports are not impacted by this.
Step 8: Test your internal filter (refer to step 5)
We recommend you test your filters to ensure you’ve excluded – or included- the right event data. If you didn’t set up a filter in step 5, skip this. To test your filter setup:
- Go to Reports in the main menu on the left-hand side of your screen.
- Select real-time in the reporting section and ask the user to visit the website in a new tab.
- You’ll get to real-time overview, select add comparison, and then search for test data filter name.
- Select Internal traffic. Please note that if you create a new differentiator, you must enable it in Property Settings > Data Filters first.
- If the data in the comparison table shows the filtered traffic correctly, you will need to activate the filter.
- To do this, go to your Admin in the bottom left corner, > Data Settings > Data Filters.
- Under your Admin, Property Settings, go to Data Filters and select activate filter.
Important to know: Only activate once you’ve verified everything is working. GA4 no longer has a separate View setting, so getting this wrong will mean a permanent loss of data within a defined period.
Step 9: Setting up Events
Previous UA users will know events as goals more commonly. However, if you are migrating this functionality from UA, there are steps you need to take:
- First, go to Admin in the bottom left corner, > Properties > Data streams.
- Select the given data stream next to the right one using the > symbol
- Scroll down on the next page and select more tagging settings
- Next, enable the toggle to collect Universal data events (if you set this up or can see some come through from your website). Note that if all your events are listed as goals, there is no need to do that!
- Close the popup and go to Setup Assistant
- In your Conversions window, select Get Started if the import option is showing. Note that you must have edit access to Properties to be able to do this step.
- Finally, select the goals you want converted into GA4 events.
Good to know: This tool makes each goal a conversion. After this last step, you can toggle an event as “not a conversion” in the Conversion section in your GA4 settings.
If you are not migrating from UA but are setting up events in GA4 as a new user and are not using the simple destination goal, we recommend using Google Tag Manager.
For a simple page view goal follow these steps in GA4:
- Go to Configure in the main menu on the left-hand side, and click Create Event.
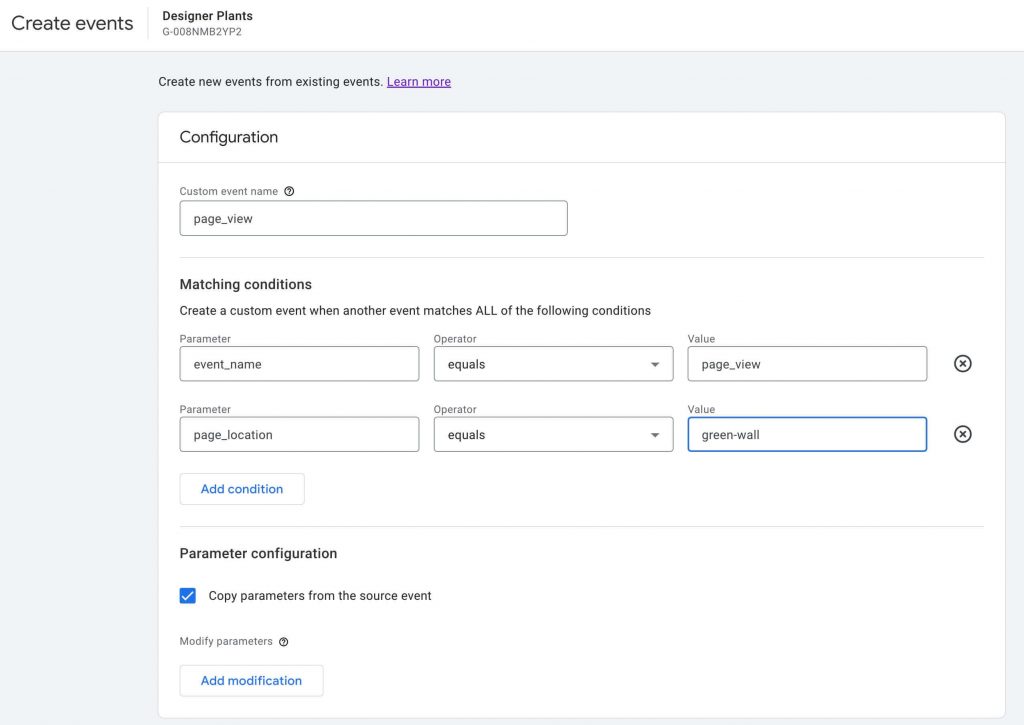
- Add the event name or use one of the recommended event names as you type.
- Insert the event name as this screenshot shows above.
- Add your page without the / at the start or domain name. If your page contains / or items after the page name be sure to include it or change “equals” to “contains”. If you have page names with a similar name, be sure to test it does not allocate both pages to this one event.
Note: Other than a simple page view, you can use this method to also tell you if a user has submitted a form on your website.
To do that, create a thank you page for each or one of your forms, add the redirect to your form (most support this), and then make this the page view goal. Easy!
- If you need to edit your imported or saved events, click Create on the previous page. It is a weird spot to do so, but it’s where it is.
Good to know: eCommerce tracking is currently manually tagged unless using a plugin like MonsterInsights for WordPress – a pain point for many clients. We hope this changes!
You can test that your events are working using the debug view and debug Google Chrome extension.
Simply download it to Google Chrome, then pin it to your bookmarks bar. Select the icon (it looks like an email) and make sure it is toggled on when visiting your website in a new tab or window.
Debug view will show what you are doing once you have performed the action for your given event. This will show you whether your event setup works. Note that sometimes there is a delay, so check back in 24 hours.
Step 10: Sync your Google products
Almost there! As a final step, you can now add key items such as Google Search Console (all types), Google Ads and Google Merchant Center, if applicable. To do this
- Go to Admin in the bottom left corner, > Property, and select the Google product(s) you wish to link.
Good to know: Some permissions are required. For example, you need to be the site owner of the Google Search Console.
After you’ve completed all these steps, congrats! You are ready to enjoy the benefits of Google Analytics 4 and are well prepared for the upgrade to your website analytics.
Keep an eye out for more resources from us. If you get stuck and need a helping hand, check out our Google Analytics service.